Wednesday, February 24, 2016

What is a router and what does it do?

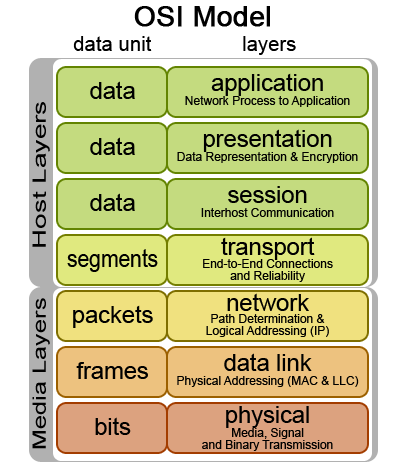
In working with students on their logical designs, it has become clear to me that many students get confused about the differences between routers and switches. So, I wanted to take a moment to talk specifically about routers. So, what is a router? Well, a router links together two similar networks in order to direct IP packets from one network to another. When you see IP, you should automatically start thinking about the OSI model and specifically, layer 3 of the OSI model.

Figure 1: The OSI Model

Typically, when students start creating their logical diagram, if they include logical configuration information at all, they always seem to focus on the internal side of this connection; the LAN side. But there is the WAN side of this connection as well. What kind of configuration information is on the WAN side of the connection? It (hopefully) obviously needs an IP address. Just to make this clear, every device connected to the Internet needs a unique IP address in order to be able to communicate with other devices over the Internet. The WAN connection also needs a subnet identified. The subnet is important because it tells the router on the WAN side of the connection which part of the IP address refers to the network and which part refers to the router itself (on the WAN side). The WAN side also needs a default gateway. If the router does not know where to route a particular packet, it needs the default gateway to forward the packet to a higher layer router that may in fact know where that particular packet should be sent. Lastly, the WAN side of the connection needs to know a DNS server so that it can resolve domain names and share that information with clients on the LAN side.

Now, the good news is that while you need to know how to configure these settings, you do not have to come up with the numbering scheme itself. If you have a static connection, this information will be provided to you by your ISP. This is typically the case for business class services in which you need your external address to stay the same so that web server, email servers, and so on can routinely be found in the same place logically. Consumers typically have dynamic addresses and this really makes things easy as the router reaches out to the ISP and obtains this information automatically. The advantage of this is obviously that it reduces your administrative burden.

Figure 2 below shows a router where the WAN port is labeled 'Line' and then it also happens to have a four port switch built into the router, with each port labeled 1 through 4. So, the WAN configuration information is associated with the WAN or 'Line' side of the router whereas the LAN side of the configuration information is associated with the clients associated with the four ports.
Figure 2: Router

On the internal side of the network, we also have configuration information that is needed. Specifically, we need an IP address and a subnet mask to tell the router which portion of the IP address represents the network and which part represents the router itself. The IP address serves as the default gateway for all the clients on the internal side of the network. Where is the rest of the configuration information internally? It's not there. When a client on the internal side of the network does not know where the server is that it is trying to communicate with, it sends the packet to its default gateway which is found in its own configuration information. That gateway is the router's LAN connection. When the router gets that request, if the requested server is not on the LAN side of the connection, it routes the packet to the WAN side of the connection which includes a default gateway so that it knows where to forward the packet.

Figure 3 illustrates a sample logical diagram. In this diagram, for the gateway router, you should see that the WAN connection is dynamically set. Again, this makes it easy on the network administrator. Internally, there is an IP address and a Subnet Mask (SM). There is also an SSID to indicate that this is also a wireless router as well as information indicating that this wireless router is capable as serving as a DHCP server.

Figure 3: Logical Diagram

You may also notice a second, internal router is included in the diagram. This design is segmenting the network at layer 3. I want to draw your attention to the WAN side of the internal router. It includes the IP address and the default gateway. Specifically, I want to draw your attention to the IP address and the fact that it is on the same subnet as the internal side of the gateway router. This is necessary so that the two routers can communicate. Also, note the internal IP address of the internal router. Note that it is on a different subnet. As a result, it can be said that this network is segmented to keep traffic from the business side of the network separate of the traffic on the personal side of the network.

So, that is what a router is and some basic information about the configuration information that goes into a router and whatnot. Commercial routers get much more complicated quickly. But, at the same time, commercial routers are beginning to take on similar dashboards to consumer grade routers making them easier to configure and use. If you have any questions, please leave a comment. Follow me on Twitter @SchuesslerPhD and until next time, happy networking.

Dr. S.

Tuesday, January 19, 2016

PANs, LANs, and WANs, Oh My!

Trying to cover some of the basics this week in my undergraduate networking class. One question that regularly comes up is what the differences are between LANs and WANs. Well of course, if you are familiar with this concept, then the answer is simple. But for some of my students who are just starting out in technology in general and networking specifically, the delineations may not be quite so clear. Below, I have put together a short little video going over the characteristics of each and included some additional explanation for other types of networks.


Personal Area Networks (PANs):  PANs are small networks, usually made up of BlueTooth devices to quickly and easily connect devices within a few feet of each other.  We see examples such as BlueTooth headsets that link together with cell phones, BlueTooth Printers that wirelessly connect to computers to eliminate cables for printers. I have a little Google Nexus 7” tablet that connects via BlueTooth, eliminating the need to plug in any sort of cabling.
Local Area Networks (LANs): LANs are larger in scale.  Though different texts will provide similar but often distinct definitions, recognize that it can sometimes be difficult to determine precisely what represents a LAN versus a CAN versus a PAN, etc.  For the most part, a LAN exists on a single property where cables and wireless access points can be deployed without the need to lease lines from a carrier or obtain permission from anyone else.  LANs will consist of two or more nodes to usually no more than a few hundred and they will usually stretch no more than a few hundred feet.
Campus Area Networks (CANs): CANs are larger still.  Think of your local university or large corporate headquarters like Microsoft in Redmond Washington.  These are areas that have a need for more than a couple hundred nodes on the network.  Rather, they have a need to connect multiple LANs together yet all on contiguous property.  This LAN of LANs as described here, can be referred to as a CAN.
Metropolitan Area Networks (MANs): MANs are larger in scope yet again; this time spanning the size of a city or even multiple cities.  These are becoming more and more common.  Denton and Granbury Texas both have MANs that provide services not only to citizens, but also to workers who require network access in the field.

Wide Area Networks (WANs): WANs are the ultimate in scope.  They span larger regions still to potentially covering the planet.  The Internet is the ultimate example of a WAN though certainly not the only WAN that exists.  Many corporations lease lines in various cities around the world in order to establish their WAN. WANs often utilize public carriers such as AT&T, Sprint, and so on in order to capitalize on what they do well rather than have to become experts themselves at laying and maintaining lines around the world, a very expensive endeavor.

Thursday, November 12, 2015

Nifty Little Toolkit

I am ALWAYS looking for tools. I love them. Little things that make things easier. So, what better place to keep them than a blog post where I can routinely edit, add to , and share with the world?

Hardware
  • RackSolutions: Need help finding the perfect rack for your equipment? This is a good place to start.
Software
  • PortQuiz.net: Ever find yourself inside an organization and were not sure if they were blocking a particular port? What about your own ISP? This nifty little site has all their ports open. Simply follow their instructions and you can test to see if a particular port is being blocked locally. Cool stuff.
  • DownDetector.com: Want to know if a particular website is down? Check out this site. They track a lot of different sites. Unfortunately, they do not track my own but hey, not everybody is perfect. Or maybe, my site is always up so there's no reason to track mine? Regardless, it can be useful when you are trying to figure out some of your Internet issues you may be facing.
  • Ultimate Boot CD: Do your work on computers? If so, there is often a need to boot to something else in order to look at the hardware in an unbiased way and/or take a look at the data on the hard disk safely. UBCD is a great tool for this. It allows you to work on a computer separate of the OS that is already loaded. Very handy.
    WayBack Machine: Wish there was an archive of the Internet; a way to look at how web sites looked in the past? There is! The WayBack Machine! Pretty cool tool.
  • Social Media:
    • HootSuite: This is a great site for managing multiple platforms. You can schedule posts which is nice, especially when you are trying to plan things out in advance.
    • Klout: Another nice site for posting across social media platforms AND it gives you a social media index score to give you an idea of how influential you are.
    • Buffer: Another site for posting and scheduling posts across various social media platforms.
    • Hastagify: Looking for the perfect hashtag? This is the site for your. Insert a search term and it will give you various hashtags associated with it.
  • Have I been Pwned? Great site for finding out if your personal information has been compromised. Interesting fellow (Troy Hunt) created this out of some research he was doing and we are the lucky benefactors. Check it out!
  • SpeedTest. How fast is your Internet connection? Stop taking your service's declared speed as fact. Stop taking their technical support's word for it. Check out SpeedTest which will test both your upload and download speed.
  • Network Management Tools
  • Hacking:
    • Kali Linux: If you are interested in ethical hacking, penetration testing, etc., this is where you need to start. Great bootable disc that comes with all kinds of tools for testing an organization's defenses.
    • Cybrary: This is a great little site. They provide quite a bit of technical training FOR FREE! Of what I have gone through so far, it is fairly well done (better than my stuff) and fairly high level meaning it should be easy for most people to digest as it is not overly technical. But, it is a GREAT way to get exposed to a lot of technical topics. Great job guys!
    • Hack This Site: Develop your ethical hacking skills. This is a great site to learn about hacking. They have progressively more difficult projects as well as discussion boards where you can discuss hacking. Of course, you should only do this in an ethical manner to better learn how to defend your systems.
    • Hacking Tutorial Tips & Tricks: Tips and tricks to learn about hacking. Please use responsibly.
    • EvilZone Hacking: Discussion board where you can read and learn about hacking from hackers.
    • AnyWho: 
    • Yansi: 
  • Metasploit. Want to learn about penetration testing? Metasploit is a professional pen testing tool. There is also a "limited features" version that is free, where you can start to develop some of your skills.
  • MX ToolBox. Test your or someone else's DNS or SMTP servers. This tool can help you determine if you have been placed on a blacklist, have DNS errors, as well as other problems.
  • External IP Addresses. Need to determine your external IP address? These tools can help with that.
  • Tor: The Onion Router. Want anonymity? Give this browser a shot. Be sure to read about. You can be virtually invisible on the Internet.
  • PC Part Picker. Want to build your own system? A little unsure about all the components you might need? Let this site help you make sure you have accounted for everything you need.
  • CSS Validator. Want to know if you CSS is valid and follows all the appropriate rules? This is the site for you. It shows you any problems you have and helps you correct them.
  • XHTML Validator. Want to validate your XHTML? This is the site for you. Much like the CSS Validator, this site well help you improve your XHTML.
Have others to add to the list? Share. I would love to build this thing out into something really useful

Thursday, October 1, 2015

Wireless Design

As part of my networking classes, I spend some time on Wireless Local Area Networks (WLANs). Wireless has become such a central point in networking, that it has to, in my ever so humble opinion, be addressed separately to make sure it garners the attention it deserves. There are just too many subtleties that can come back to bite you if you are not careful.

While there are lots of different aspects to WLANs such as security, different standards, etc, one area that I think can be very beneficial to students is understanding how radio signals propagate and how objects interfere with those radio signals, and how to plan for the proper resource allocation of Wireless Access Points (WAPs).

But how do you decide where to place devices? You can "guestimate" or simply place your WAP wherever is convenient but unless you are working in a small space, you are likely to have dead spots. You can try the traditional approach which is often completed by doing a site survey. This is where you go and physically visit a proposed site. You temporarily place a WAP and walk around with a signal strength reader or laptop, recording the signal strength in various locations. You then move the WAP to a new location and repeat the process until you feel like you have found the ideal location for the WAP to give you the best coverage. This approach does work. But, it can be tedious and is an after the fact solution. As you can imagine, this can be time consuming and an expensive endeavor, ranging from $2500-$10,000 per building or more depending on the size of the building, the number of locations, and various other factors.

For an arguably better approach, you can actually determine the number of WAPs and their approximate location BEFORE you go to the trouble of purchasing and setting up all of your equipment by completing a Predictive Site Survey. While I am sure there are several ways to do this, the tool that I am familiar with is a tool provided by a company named Aerohive. Aerohive is a manufacturer of commercial Wireless Access Points and pushes for web based management of those WAPs. Pretty cool stuff. But, they also have what they call, a WiFi Planner tool. This tool allows you to enter the address of your facility using Google Maps and then draw your floor plan directly on their web page or to upload a PNG of your floor plan and then, based on the walls and wireless standard, it can automatically determine the number and location your WAPs need to be located on the plan, providing a heat map to illustrate coverage. Is that cool or what? You can also manually place WAPs and see the effect that it has on your coverage as well.

So, how do you use this? Well, you can register for a trial account for free at: https://www.aerohive.com/planner/.


If you select Try HiveManager NG, it will take you to the bottom of the page where you can register. Once registered and you have confirmed your account through the email they send you, return to https://www.aerohive.com/planner/ to login with the account information that you setup. 


Once you do that, you will be presented with their dashboard. Impressive isn't it? Remember, this is a dashboard for managing your wireless network through the cloud. If this were a live network, you could keep an eye on your various WAPs, their performance, clients, etc. Again, very cool stuff. But, we are only interested in their planner tool, so select Plan in the navigation bar at the top.


That will bring you to this page. Cool huh? From here, you can do a few things. You can import your own map. Say you have a few facilities across the metroplex already saved to a Google Map. You could import that map here. But, for our purposes, let's click Add Location.


Add Location brings up the dialog box we have below. You've got several different options to choose from. First, you need to create a Location, followed by creating a Building followed by creating a Floor. Type in whatever you want; I used Schuessler Sounds, Service, and 1st Floor respectively for each name. You can also type in your specific address or simply type in your city and state and click Save for each one.


With that done, select the name you gave for the floor you are working on in the navigation bar on the left. For me again, the name I gave it was 1st Floor. Once you select it, your screen should look similar to the one below.


Now you are ready to upload your floor plan. Click on Upload Floor Plan to see the dialog box below.


Click on Upload New From Computer to open the file upload dialog box below.


Click Choose and then navigate to wherever you save your Visio image of your floor plan. Note: you must save your Visio floor plan as a PNG file to upload it here.

Once you have selected the image file of your floor plan, click Upload and you will be presented with the dialog box below.


This basically wants to know how much of the image is your building versus how much is "extra". You can actually tweak the scale later so I recommend simply expanding the selection bars all the way to the corners to capture the entire image. Once you do, click Save All. Once I did that, I was presented with the following screen.


First click on Size the Plan and then select the Size Manually Check Box. Once you do, you should see something similar to the dialog box below. Notice the oval around the two red plus marks. This is how you are going to add scale to your drawing so that Aerohive knows how long your various walls are.


On my drawing, I drug the left red plus mark down so it was below the dialog box. Then, I drug the right red plus mark to the right wall. I then entered the distance between those two red plus marks to add scale to the drawing. In my case, that distance was 53 feet (I rounded up). Then click Apply to set the scale.

Now, you are pretty much done. The only thing left to do is actually generate the heat male. Do this by clicking on Plan Devices on the navigation bar at the top.


In the Auto Plan For group, select the More drop down box to select things like 2.4 GHz or 5 GHz, Channel Width, Device Type, Signal Strength, and/or Power. Keep in mind, this is for Aerohive products. But, this is still very useful. I would focus on the device Type and the specific standard you are looking to implement. In my case, I selected a device that said it was compliant with 802.11ac and then I clicked Auto Place. Just for giggles, play around with the 2.4 GHz and the 5 GHz ranges. How does this affect your coverage? How does it affect your speed? Neither choice is "right". It just depends on what you are trying to do. If you want to restrict your devices to the 802.11ac standard to get the benefit of speed, recognize that by operating at 5 GHz, you will not get the same range that you would get if your were operating at 2.4 GHz and thus, might need more WAPs for adequate coverage.


With that done, you end up with this:


Stunning, isn't it? OK, well, not really. It does at least indicate the approximate location in the building that the WAP should be located. It also tells me that I only need one WAP. That's cool to know isn't it? But, what else can I get out of this?

Well, click on View Heat Map in the navigation bar at the top. Just below the navigation bar, there are also several options. In the Show On Heatmap group, click RSSI.


MUCH cooler, eh? Now, you can play around a bit. Select the 2.4 GHz range under Radio to see how your heatmap changes. Does this make you want to reconsider changing wireless standards? Will you only allow 2.4 or 5 GHz devices? These are some of the decisions you will have to make.

Now, the above example is for illustration purposes only. In this floor plan, there is one crucial aspect missing: internal walls. Internal walls will have a huge effect on how the radio wave propagate throughout the building. You should not see concentric circle propagating around the WAP as you do in the above image. Rather, you should see concentric circle up until the radio signal impact a surface such as a wall. If Aerohive does not detect the walls in your diagram, you can go back and manually add them. Be sure to specify the materials they are made of as this will impact the signal propagation as well. The more accurate your floor plan, the more accurate your heatmap is going to be.

Ideally, you would start with this approach and then go back to do a modified site survey, where you are simply confirming successful wireless coverage in your building.

Hopefully you found this useful. If you have any questions, comments, or suggestions, please feel free to let me know.

Wednesday, September 2, 2015

Using Oracle's Virtual Box to Explore OSs and Networking

So, I teach several networking and networking related class. From undergraduate Data Communications to graduate Networking for Managers and Windows/Linux server classes. Quite frankly, they're the coolest classes. Since many of these are online classes, I tried to find a way to automate as much as I could and minimize my personal investment of time/effort all while still trying to make sure students have a great, interactive, and engaging experience. I feel like I have had success in that to a large degree due to my use of TestOut. It does a nice job of providing additional materials, notes, and the opportunity to certify for several of their courses. But, best of all is that it has simulations which help students get their hands dirty.

But, what about those that actually want to get their hand dirty and play around with a live system? Technology has come a long way and there are lots of options but many involve a lot of cost and/or time commitment, both of which I always seem to be short of. But virtualization software on the desktop holds a lot of promise, especially since our students have access to lots of free Microsoft software through DreamSpark. So, with that in mind, this is a brief tutorial over how to go about setting up virtualization software and then loading an operating system (OS) to play around with.

Before getting started, if you happen to be one of my students, review section 5.9 of our TestOut Networking Pro class. They give a nice overview of virtualization. Now, there are several choices when it comes to virtualization software. As part of the DreamSpark subscription, students can download and install Microsoft Virtual PC for free. This works ok for Microsoft products but really seems to struggle with Linux flavors. Personally, I love Oracle's Virtual Box. While you can read more about them on their site, you can see from the screen shot that they support several different host OSs. Me personally, I tend to operate in the Windows world, so I am selecting VirtualBox for Windows Hosts. I should note here, that when I say host, I am referring to the physical machine and its OS. It is said to be hosting the virtual machines. So, be aware of the terminology. You should also note their advisory stating that at the time of this writing, Windows 10 is not currently supported. You may be able to get it to work with one of the test builds but be aware that you may run into problems. Just for reference, I am installing this on a Windows 7 host.

Virtual Box Download Page
So, once I click on the x86/amd64  link to download VirtualBox, I am promoted for where I want to download the installation package (VirtualBox-5.0.2-102096-Win.exe - this name will change as the package is updated). I will simply save it to my default downloads folder. Once the download is complete I run the installation package. When I do so, I am presented with the Setup dialog box. Simply click 'Next' to proceed.


At this point, you will be asked about any Custom Setup features that you want. If necessary, you can select and alternative location to install Virtual Box by selecting the Browse button. I would simply click next to proceed.


The next Custom Setup dialog box allows you to configure the setup program to automatically create a Virtual Box shortcut on the desktop, to put a shortcut in your Quick Launch bar, and to Register file associations. Again, I would simply go with the default options set here.


Because the virtualization software interacts with your host OS and its hardware, installing it is temporarily going to interupt your network adapter so that both your host and virtual machines will be able to access the network. Don't be alarmed. Simply click 'Yes'.


Now, you are actually ready for the installation to occur. Click 'Install'


Now it is time to wait. This may take a few minutes.


At this point, you may be presented with one or more dialog boxes resembling the one you see below. I ended up seeing it three times as Virtual Box was installing various drivers.


At this point, you are pretty much done setting up Virtual Box. Click 'Finish' and let's go ahead and jump into installing our first OS.


As you can see here, I already have a couple of Virtual Machines (VMs) loaded on this machine. But, to walk you through the process of creating your own VM like you might if you downloaded the ISO from DreamSpark, I will setup another VM temporarily. Click on 'New' to begin the process.


You can name the VM anything you want. I recommend that you make the name descriptive as as you add machines, it can start to become confusing. Since I am going to install Windows Server 2008, I have entered that in the 'Name' field. Note, I am only installing 2008 for demonstration purposes. I happen to have an ISO handy that I am using for this demonstration. But, your installation of whatever you decide to install will proceed similarly. Once names, select the 'Type' of OS. They give you several options including Windows, Linux, Solaris, etc. Lastly, select the 'Version'. If you select the incorrect one, you will simply get an error. Start over and correct your selection. Once you have made all of your selections, click 'Next'


Next, you need to allocate RAM to the VM. Clearly, you are limited by how much physical RAM the host machine has. But, keep in mind that the host machine has to also continue to function while running the VM. Ideally, you have LOTS of RAM. I am sitting at 4 gig here which is pretty small by today's standards. I would like to give it more RAM but since this is just a demonstation, I will simply accept the default of 512 MB. Refer to the recommended RAM requirements for your OS you are installing as a VM.


Now, you need to make a decision about your virtual 'Hard disk'. For a new install, you are going to 'Create a virtual hard disk now'. Click 'Create'.


Now, you need to select the 'Hard disk file type'. I have a tendency to stick with the default settings. However, there are reasons to educate yourselves over these different file types. It turns out that in some instances, you can actually fire up a VM from other VM platforms, as long as the virtual hard disk type is compatible. So, this decision can be an important one. But, as I said, I tend to stick with defaults and that is what I am going to do here by clicking 'Next'.


Yet another decision we have to make regarding the virtual hard disk is whether or not it is going to be dynamic as opposed to fixed. Each has a legitimate purpose. Dynamic allows the size of the virtual hard disk to grow as necessary. But, this trade that flexibility with speed which is what you get if you have a fixed size hard drive. This choice really depends on your needs. If you have limited space on your physical hard disk, you may want to select fixed size in order to make sure the virtual hard disk size does not get out of control. I am simply going to click 'Next'.


The next screen allows you to configure the location of the virtual hard disk and set a size for it. Click 'Create' to complete the creation of the VM.


So now, we have created the VM. But, we're still not done. We have just created the shell of the VM. There is still not OS installed on that virtual machine just yet. With your newly create shell of a VM created, click on 'Start" to start up your VM.


Because there is no OS loaded on the VM yet, your virtualization window is going to be empty as seen below.


What we need to do is to tell the VM software where the ISO file we downloaded from DreamSpark is located. Click on 'Devices', hover over 'Optical Drives', and then select 'Choose Disk Image'. Navigate to where ever you downloaded your ISO image to and select that ISO file.


Then navigate back to the 'Machine" button on the navigation bar and select 'Reset'. This will reboot your newly created VM, pointing to the ISO file to boot from and install the OS.


At this point, you simply go through the setup process for the particular OS you are installing.


This is really just an overview. There are LOTS of features of Virtual Box which make it an ideal playground for virtual labs, learning about technology, applications, viruses, networks, etc. VERY cool stuff. Hopefully you fine this useful. If you think of anything I have left out, need to add, or would like to see yourself, drop me a note and I will see about getting it created. Thanks and enjoy.

Monday, July 6, 2015

Methodically Evaluating Your Security Situation

Security is as much an art as it is a science. While we can teach the science side of security by emphasizing the need to methodically approach security, the art side can only be developed through practice and careful creativity. Part of my students' semester projects is to address the security needs of an organization. I cannot emphasize enough that security is a design decision, not a product to be applied after the network is assembled. Designing a network with security in mind is different because it impacts the protocols, devices, and other network components we choose. For example, if we want to segment the network at layer 2, we need to make sure the switch we recommend supports VLANs. Likewise, if we are trying to segment the network design at layer 3, we will require additional routers to link the various segments. Security is a process, not hardware and software. Security truly is job security because it is a never ending battle to protect systems from obsolescence, natural disasters, human ineptitude, malicious attacks, etc. As a result, I tell them that they need to take a methodical and logical approach to addressing the security of an organization as it relates to their network and computer systems. Failure to do so will result in a hodge-podge of countermeasures that likely reflect the bias of the designer and fail to provide comprehensive protection to the system.

The first thing I would recommend is familiarizing yourself with Microsoft's Security Assessment Tool 4.0. When you first launch it, you will encounter the screen below.


Click the yellow 'Start' button in the bottom right corner and start answering a few basic questions about your organization. These tend to be relatively high level questions that do not require a computer science degree to answer. For example, insert a name under 'Company Name'. How many employees does your company have? Etc. As you answer each question, scroll down to the bottom and select 'Next' in the bottom right corner of the screen to advance to the next page. This step is just creating a profile of your organization.


Once you reach the end of the questions, click the yellow 'Create New Assessment' half way down on the left hand side of the screen. This will present you with the following dialog box. Select 'New' and name your assessment.


I named mind 'Semester Project: Security Assessment'. Then click 'OK'.


Now, you need to start assessing the security posture of the organization. You will be guided through a series of questions that help you to determine the state of your infrastructure, application, operations, and people security.


Answer each of the questions, scrolling down and then click 'Next' in the bottom right to advance to the next page. Depending on your specific answers, some sub-questions may or may not need to be addressed. Those that do not need to be addressed will be grayed out. Once you get to the final screen and have finished answering the questions, a 'Reports' button will appear at the bottom of the navigation bar on the left.


Click on that and you will be presented with the 'Summary Report' Which can be seen below. Additionally, you have two additional tabs which can prove useful. The second tab includes and option to save the report as a DOCX file or as an image file. Alternatively, you can print the report if you wish (HINT: You could potentially print it as a PDF).


The reports has LOTS of useful information but there are a few things that are particularly important for our purposes. For example, below is an example of the Risk-Defense Distribution figure that can be helpful in informing you where you should be concentrating your use of countermeasures.


What I like about this tool is that it gives you categories of assets that you need to protect such as infrastructure, applications, operations, and people which you can use to classify your assets and it shows the areas where you need to consider implementing appropriate countermeasures to protect against, the threats identified from the tool and as can be seen below, prioritizes your need for appropriate countermeasures.


Once you have identified the areas of risk, this should inform you as to the areas where you need to more thoroughly refine your countermeasures. For example, the figure above indicates that operations and infrastructure are at greater risk and the defense in depth is lowest for applications. The countermeasures that we propose should probably tend to focus in these areas so that we can lower our risk and increase our defenses. To look at this from a "hacker's" perspective, I might want to attack this organization's applications since it is their weakest area of defense.

The result is the implementation of various countermeasures that are targeted to help shore up areas where your organization scores more poorly on. Is this the only approach? Of course not. There are lots of approaches. In general, some of the very early approaches to security were simple checklists. This was nice because it was intuitive and easy to develop but lacked any sort of customization for organizations in various industries and of various sizes. Using this approach, one might list assets down the rows and various threats across the columns. Using a numbered list below for various countermeasures, one could populate various cells as appropriate.

Schuessler, J. (2013). Contemporary Threats and Countermeasures: A Security Evaluation. Journal of Information Privacy and Security, 9(2), 20. jips.utep.edu

Personally, I like this approach as it is very intuitive and easy to follow along. But, this approach can be improved. Some of these assets are more important that others. Some threats are more likely to occur than others. Some threats, if realized, can be more catastrophic that others. Using some additional columns, rows, and/or color, you could make the table more valuable by estimating the degree of threat, likelihood of occurrence, degree of protection. In the sample Google Sheet linked above, I have added some additional columns to incorporate the BRP and DiDI scores to calculate the risk associated with each type of asset scored by the MS Security Assessment Tool. For example, the BRP for Infrastructure was 13%. For Applications, it was 11%, and so on. Similarly, the DiDI score for Infrastructure was 25%, for Applications was 47%, etc. By multiplying the respective numbers, you can determine the risk for each category. Finally, you are able to calculate the risk for each type of asset within each category. I simply weighted each asset, making sure all assets within a category totaled the overall category weight. This shows which assets need to be focused employing various countermeasures.

Impact (BRP Score in Percent)Liklihood (1-DiDI Score in Percent)Risk (Impact x Liklihood - Higher Values Represent More Risk Requiring More Attention)
Infrastructure13.00%25.00%3.25%
Routers4.00%4.00%0.16%
Switches1.00%10.00%0.10%
Servers4.00%6.00%0.24%
Media4.00%5.00%0.20%
Applications11.00%47.00%5.17%
Operating Systems1.00%10.00%0.10%
Front Office Applications1.00%10.00%0.10%
Back Office Applications1.00%10.00%0.10%
Data8.00%17.00%1.36%
Operations13.00%16.00%2.08%
Environment5.00%4.00%0.20%
Security Policy2.00%4.00%0.08%
Patch & Update Management5.00%4.00%0.20%
Backup & Recovery1.00%4.00%0.04%
People7.00%5.00%0.35%
Administrators4.00%3.00%0.12%
Internal Users2.00%1.00%0.02%
External Users1.00%1.00%0.01%

Still other valuable yet still somewhat intuitive approaches include something similar to use cases for various threats/assets as discussed in FitzGerald, Dennis, and Durcikova (2015). This is again a great approach and more comprehensive than the approach discussed above. However, this approach can also be quite tedious as a separate use-case needs to be completed for each asset.

The point is not to inundate you with different approaches but rather, to emphasize the need to take a methodical approach to identifying threats and appropriate countermeasures. We live in a world where resources are limited. If that is the case, we have to make sure that we are getting the most bang for our buck in security.