But, what about those that actually want to get their hand dirty and play around with a live system? Technology has come a long way and there are lots of options but many involve a lot of cost and/or time commitment, both of which I always seem to be short of. But virtualization software on the desktop holds a lot of promise, especially since our students have access to lots of free Microsoft software through DreamSpark. So, with that in mind, this is a brief tutorial over how to go about setting up virtualization software and then loading an operating system (OS) to play around with.
Before getting started, if you happen to be one of my students, review section 5.9 of our TestOut Networking Pro class. They give a nice overview of virtualization. Now, there are several choices when it comes to virtualization software. As part of the DreamSpark subscription, students can download and install Microsoft Virtual PC for free. This works ok for Microsoft products but really seems to struggle with Linux flavors. Personally, I love Oracle's Virtual Box. While you can read more about them on their site, you can see from the screen shot that they support several different host OSs. Me personally, I tend to operate in the Windows world, so I am selecting VirtualBox for Windows Hosts. I should note here, that when I say host, I am referring to the physical machine and its OS. It is said to be hosting the virtual machines. So, be aware of the terminology. You should also note their advisory stating that at the time of this writing, Windows 10 is not currently supported. You may be able to get it to work with one of the test builds but be aware that you may run into problems. Just for reference, I am installing this on a Windows 7 host.
 |
| Virtual Box Download Page |
So, once I click on the x86/amd64 link to download VirtualBox, I am promoted for where I want to download the installation package (VirtualBox-5.0.2-102096-Win.exe - this name will change as the package is updated). I will simply save it to my default downloads folder. Once the download is complete I run the installation package. When I do so, I am presented with the Setup dialog box. Simply click 'Next' to proceed.

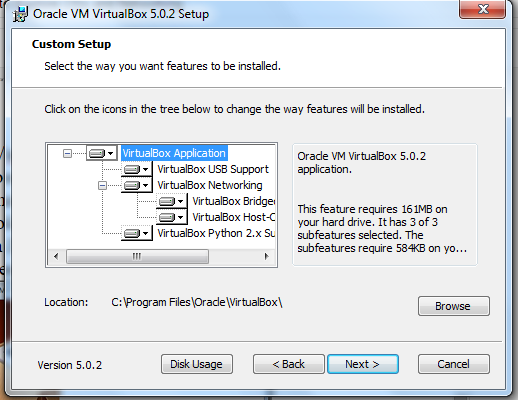
At this point, you will be asked about any Custom Setup features that you want. If necessary, you can select and alternative location to install Virtual Box by selecting the Browse button. I would simply click next to proceed.
The next Custom Setup dialog box allows you to configure the setup program to automatically create a Virtual Box shortcut on the desktop, to put a shortcut in your Quick Launch bar, and to Register file associations. Again, I would simply go with the default options set here.

Because the virtualization software interacts with your host OS and its hardware, installing it is temporarily going to interupt your network adapter so that both your host and virtual machines will be able to access the network. Don't be alarmed. Simply click 'Yes'.

Now, you are actually ready for the installation to occur. Click 'Install'

Now it is time to wait. This may take a few minutes.

At this point, you may be presented with one or more dialog boxes resembling the one you see below. I ended up seeing it three times as Virtual Box was installing various drivers.

At this point, you are pretty much done setting up Virtual Box. Click 'Finish' and let's go ahead and jump into installing our first OS.

As you can see here, I already have a couple of Virtual Machines (VMs) loaded on this machine. But, to walk you through the process of creating your own VM like you might if you downloaded the ISO from DreamSpark, I will setup another VM temporarily. Click on 'New' to begin the process.

You can name the VM anything you want. I recommend that you make the name descriptive as as you add machines, it can start to become confusing. Since I am going to install Windows Server 2008, I have entered that in the 'Name' field. Note, I am only installing 2008 for demonstration purposes. I happen to have an ISO handy that I am using for this demonstration. But, your installation of whatever you decide to install will proceed similarly. Once names, select the 'Type' of OS. They give you several options including Windows, Linux, Solaris, etc. Lastly, select the 'Version'. If you select the incorrect one, you will simply get an error. Start over and correct your selection. Once you have made all of your selections, click 'Next'

Next, you need to allocate RAM to the VM. Clearly, you are limited by how much physical RAM the host machine has. But, keep in mind that the host machine has to also continue to function while running the VM. Ideally, you have LOTS of RAM. I am sitting at 4 gig here which is pretty small by today's standards. I would like to give it more RAM but since this is just a demonstation, I will simply accept the default of 512 MB. Refer to the recommended RAM requirements for your OS you are installing as a VM.

Now, you need to make a decision about your virtual 'Hard disk'. For a new install, you are going to 'Create a virtual hard disk now'. Click 'Create'.

Now, you need to select the 'Hard disk file type'. I have a tendency to stick with the default settings. However, there are reasons to educate yourselves over these different file types. It turns out that in some instances, you can actually fire up a VM from other VM platforms, as long as the virtual hard disk type is compatible. So, this decision can be an important one. But, as I said, I tend to stick with defaults and that is what I am going to do here by clicking 'Next'.

Yet another decision we have to make regarding the virtual hard disk is whether or not it is going to be dynamic as opposed to fixed. Each has a legitimate purpose. Dynamic allows the size of the virtual hard disk to grow as necessary. But, this trade that flexibility with speed which is what you get if you have a fixed size hard drive. This choice really depends on your needs. If you have limited space on your physical hard disk, you may want to select fixed size in order to make sure the virtual hard disk size does not get out of control. I am simply going to click 'Next'.

The next screen allows you to configure the location of the virtual hard disk and set a size for it. Click 'Create' to complete the creation of the VM.

So now, we have created the VM. But, we're still not done. We have just created the shell of the VM. There is still not OS installed on that virtual machine just yet. With your newly create shell of a VM created, click on 'Start" to start up your VM.

Because there is no OS loaded on the VM yet, your virtualization window is going to be empty as seen below.

What we need to do is to tell the VM software where the ISO file we downloaded from DreamSpark is located. Click on 'Devices', hover over 'Optical Drives', and then select 'Choose Disk Image'. Navigate to where ever you downloaded your ISO image to and select that ISO file.

Then navigate back to the 'Machine" button on the navigation bar and select 'Reset'. This will reboot your newly created VM, pointing to the ISO file to boot from and install the OS.

At this point, you simply go through the setup process for the particular OS you are installing.

This is really just an overview. There are LOTS of features of Virtual Box which make it an ideal playground for virtual labs, learning about technology, applications, viruses, networks, etc. VERY cool stuff. Hopefully you fine this useful. If you think of anything I have left out, need to add, or would like to see yourself, drop me a note and I will see about getting it created. Thanks and enjoy.